How to Insert and Edit a Table in a Slide: The Ultimate Guide
Tables are a powerful tool for presenting information in a clear and concise way. They can be used to sort content , compare data, or simply organize complex ideas in a way that's easy for your audience to understand. Learning how to insert a table in google slides is a valuable skill for anyone who creates presentations.
In this guide, we'll walk you through the process of adding tables to your slides, from scratch or using pre-designed templates. We'll also cover how to customize the look and feel of your tables to match your presentation's overall theme.
Catalogs:
How to Insert a Table in a Slide?
Adding a table to your slide is a breeze. Here's how to do it:
-
Open your Google Slides presentation and navigate to the slide where you want to insert the table.
-
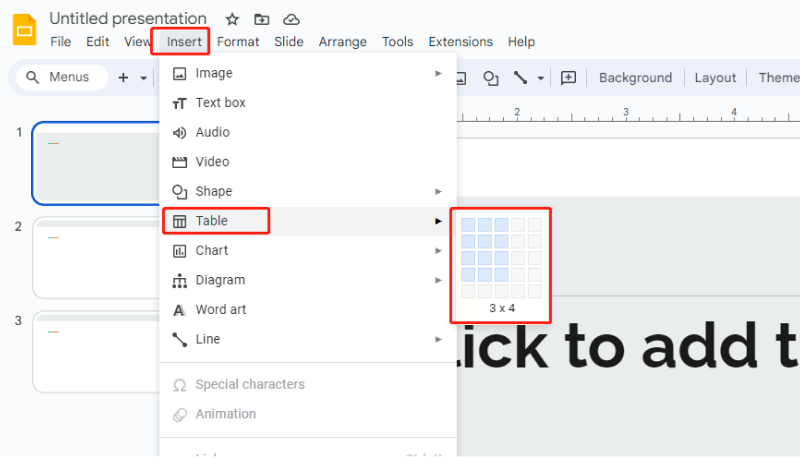
Click on the Insert menu and select Table. This will open a sidebar on the right side of your screen.
-
Use the grid in the sidebar to choose the desired number of rows and columns for your table. For example, if you want a table with three columns and four rows, click on the 3x4 option.
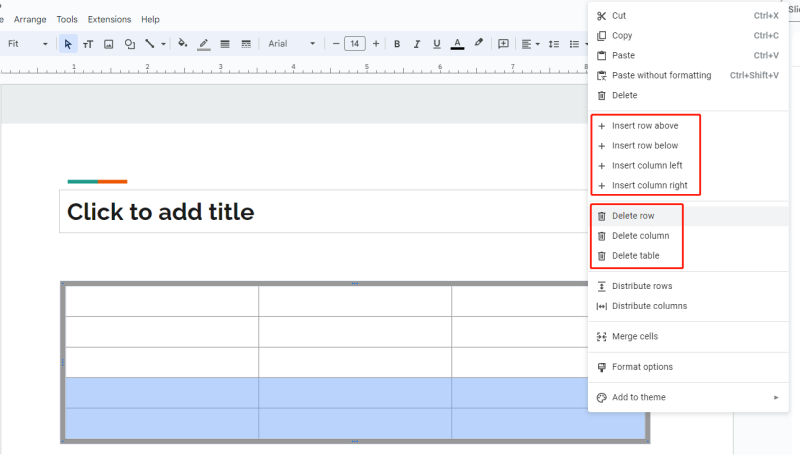
Don't worry if you miscalculate the number of rows or columns. You can easily add or remove them later. Once you've created your table, right-click on it and select the desired option from the context menu.
How to Edit the Style of a Table in Slides?
Google Slides offers a variety of options to customize the appearance of your table. Here are a few ways to make your table stand out:
-
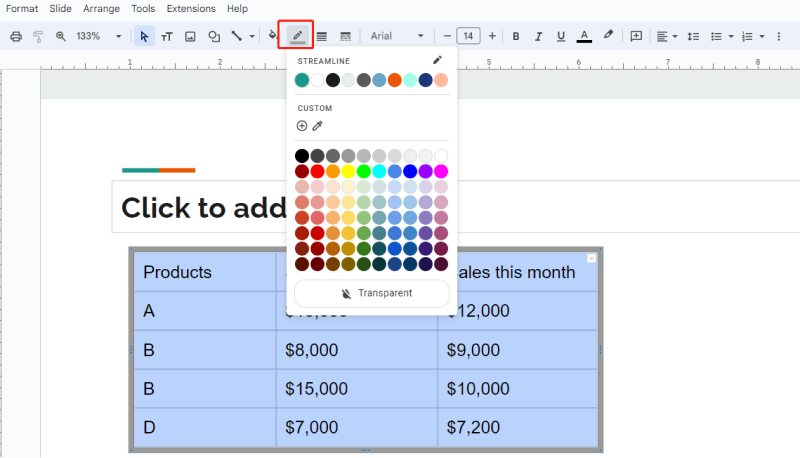
Change the Border Color: Click on the table outline and select Border color. Choose a color that complements your presentation's theme. Sticking to the template's color palette helps maintain visual consistency.
-
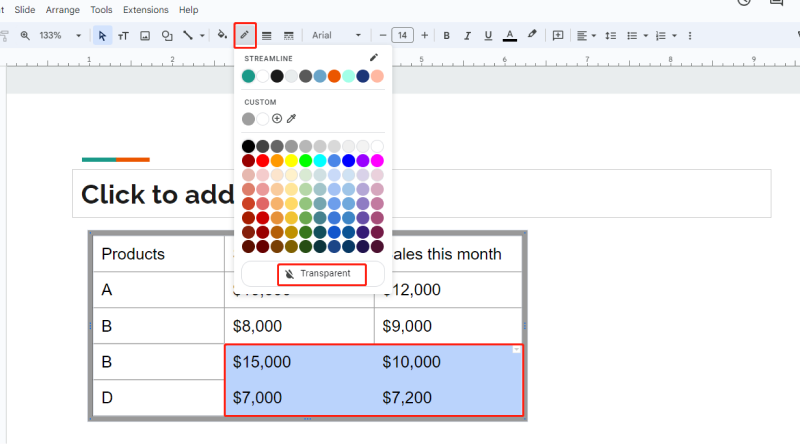
Make Cells Transparent: Select the outline of a specific cell and choose Transparent under Border color. This can be useful for highlighting specific data points.
-
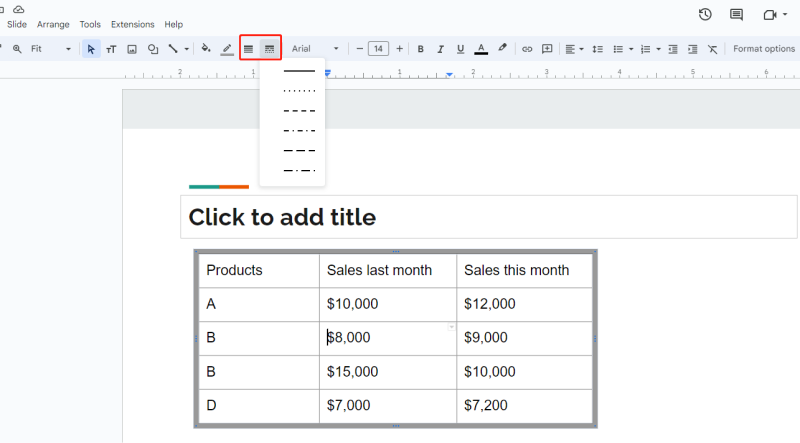
Adjust Border Weight and Style: Use Border weight to create a thicker outline or Border dash for a dotted line
-
Resize the Table: Drag any corner of the table inward to make it smaller or outward to enlarge it. Hold down Shift while dragging to maintain the table's proportions.
Remember, a well-designed table should be visually appealing and easy to read. Experiment with different styling options to find the perfect balance for your presentation.
How to Add Content to the Table in Slides?
Now that your table is styled, it's time to fill it with content. Here's how:
-
Double-click on any cell to start typing your text.
-
Complete the cells with the information you want to present. Keep in mind that tables work best with concise data and short text entries.
-
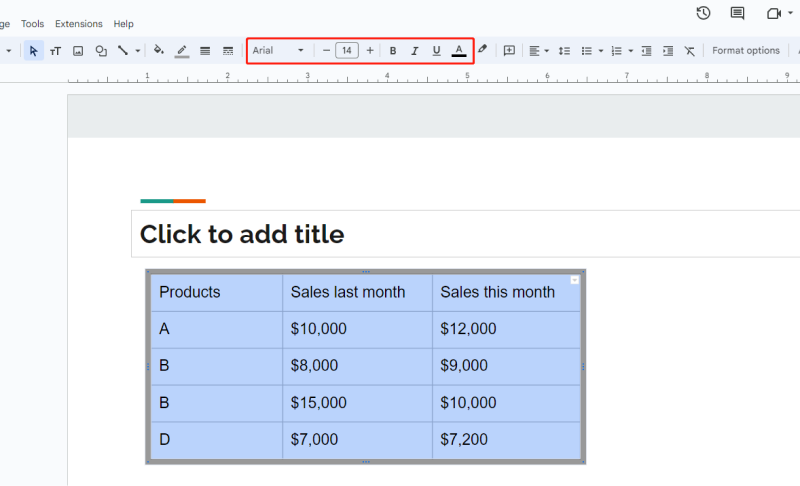
Style Your Text: Select the text you want to modify by clicking and dragging over the desired cells. Use the options Font, Font size, and Text color to format your content. It's a good idea to maintain consistency with the fonts and colors used throughout your presentation.
Pro Tip:
Use bold text for headers to differentiate them from the content in the rest of the table. This helps viewers quickly identify key information.
You can also use contrasting fonts to make your table even more visually appealing. For instance, consider using a different font for the headers compared to the text within the table's body.
Don't forget to align your text for optimal readability. In most cases, centering text within table cells creates a clean and professional look.
FAQs
1. How to make a grid table in Google Slides?
Creating a grid table in Google Slides is straightforward. When inserting a table, choose the desired number of rows and columns. Then, adjust the border weight and color to create a prominent grid effect. For a cleaner look, consider removing the cell fill color.
2. Is there a way to make a table of contents in Google Slides?
Yes, while Google Slides doesn't have a built-in table of contents feature like Docs, you can manually create one. Insert a text box and list your slide titles with corresponding slide numbers. Hyperlink each title to its respective slide for easy navigation.
3. What is the shortcut to add rows to a table in Google Slides?
Unfortunately, there isn't a specific keyboard shortcut to add rows in Google Slides. However, you can right-click within the table and select "Insert row above" or "Insert row below" to quickly add additional rows.
Conclusion
Mastering the art of how to insert a table in a slide is a valuable skill for any presenter. By following these steps and incorporating the tips provided, you can create professional-looking tables that effectively communicate your data and enhance the overall impact of your presentations. By effectively utilizing tables in your slides, you can transform complex information into easily digestible content, leaving a lasting impression on your audience!
For a faster way to create polished and engaging presentations, consider using Tenorshare AI Slides. With just a few clicks, you can generate professional-quality slides that are ready to impress, saving you time and effort.
Tenorshare AI Slides
- One-click AI presentation maker for stunning slides in minutes.
- Powerful AI ensures professional outlines and content.
- Beautiful, well-designed templates at your fingertips.
- Free access for every user, no strings attached.
- Perfect for businesses, educators, students, and personal projects.
You Might Also Like
- How to Add, Change or Remove Background Images and Colors in Google Slides
- How to Change Text Color in Google Slides Step by Step Guide 2026
- How to Add, Insert, and Edit Text or Image Watermarks in Google Slides
- How to Change the Size of a Google Slide in Simple Clicks
- 2 Free Ways: How to Convert PPT to Google Slides
- How to Write a Compelling Cover Letter for a Pharmacist Position: Tips and Example

