How to Make or Add A Mind Map in Google Slides? Easy Steps!
Mind maps are powerful tools for organizing and understanding information. They visually represent ideas and concepts, making them easier to recall and comprehend. In this guide, we'll show you how to create make mind maps using Google Slides.
Catalogs:
How To Make Mind Maps in Google Slides from Scratch
Step 1. Planning Your Mind Map
Before jumping into Google Slides, it's essential to have a clear plan for your mind map in Google Slides. The purpose is to simplify complex topics and present them in a way that is easy to understand. Let's take how to learn a foreign language effectively as an example in this blog.
Think about the various aspects of language learning that you want to cover. For instance, you might want to include vocabulary, grammar, pronunciation, listening, speaking, and cultural immersion. Consider how these elements will branch out from your central idea and how they interconnect. This will help keep the mind map organized and logical.
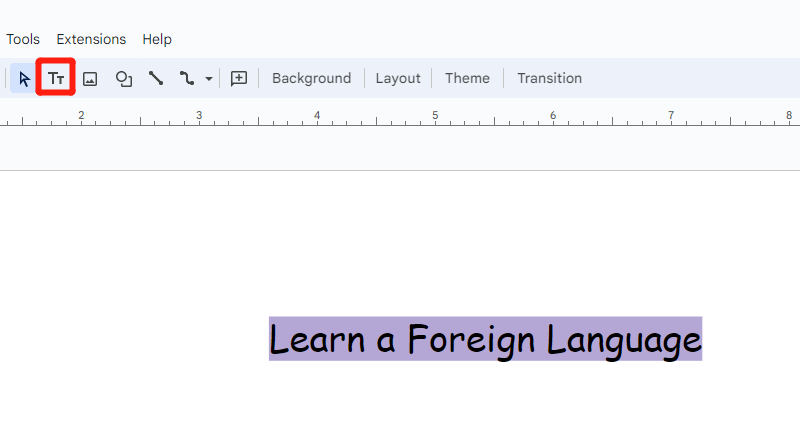
Step 2. Creating the Central Idea
The central idea is the core of your mind map, representing the main topic around which all other ideas will revolve. Here's how to set up your central idea in Google Slides:
- Open a new slide in Google Slides.
- Insert a text box by going to Text box, then place it in the center or upper half of the slide.
- Type your main concept, such as "Learn a Foreign Language," inside the text box.
- Customize the text by adjusting the font, size, color, and alignment using the toolbar options.
Pro tip:
Use a bold and prominent font for the central idea to create a strong visual hierarchy. This makes it easy to identify as the main focus of the mind map.
Step 3. Adding Branches to Your Mind Map
With your central idea in place, it's time to add branches. Branches represent the subtopics or related ideas that connect back to your main idea. In our example of learning a foreign language, branches could include key areas like Vocabulary, Grammar, Listening, Speaking, and Cultural Immersion. Here's how to add branches Iinmind map in Google Slides:
- Decide how many branches you need. For this example, we'll create five branches.
- Insert a rectangle shape for each branch by going to Shape → Shapes → Rectangle, then click and drag to create the shape.
- Style each shape using the Fill color and Border color options to match your design.
- Copy and paste the shape to create additional branches, positioning them around the central idea.
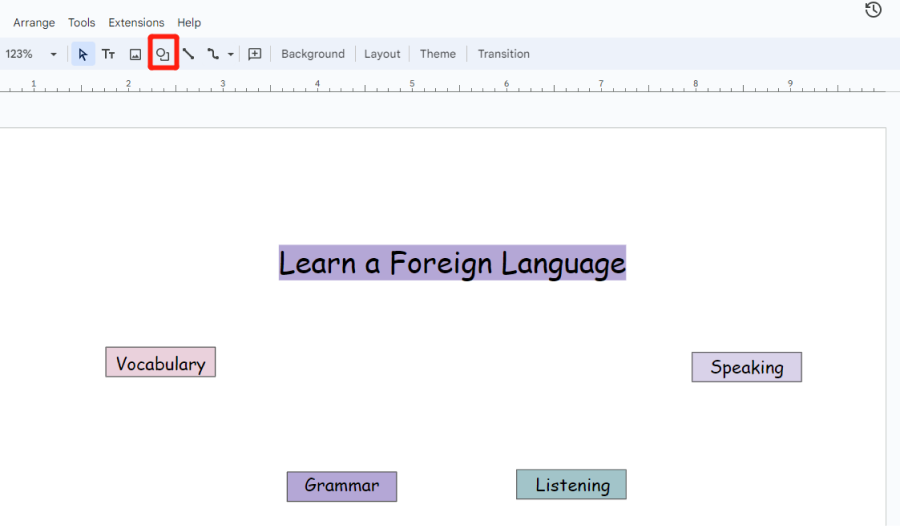
Once you've added the shapes, it's time to label them. Click on each rectangle and type the relevant keyword, such as "Vocabulary" or "Grammar." Customize the text using the font editing options in the toolbar.
Important note
You can use different colors for each branch to distinguish between different concepts. This makes the mind map visually engaging and easier to study.
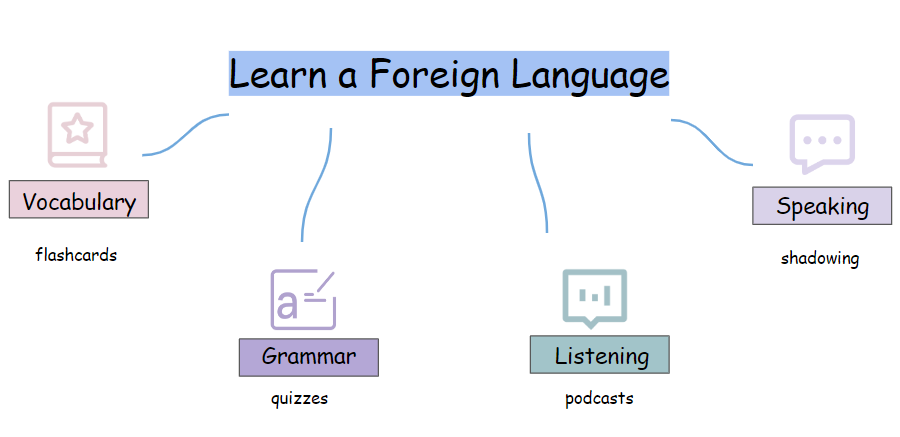
Step 4. Adding Details to Each Branch
Now that you have the main branches in place, you can add more details to each one. For example, under "Vocabulary," you could include methods like flashcards, apps, and reading. Here's how to add these details:
- Under each rectangle, insert a new text box by clicking Text box.
- Type a brief description or a few key points that further explain the branch's topic. For example, under "Speaking," you could list "language exchange," "conversation classes," and "shadowing technique."
- Format the text box to match the style of your mind map.

Adding these details provides more context and actionable steps for each branch, making the mind map a more practical learning tool.
Step 5. Enhancing Your Mind Map with Design Elements
A well-designed mind map is not just about content; it's also about presentation. Use design elements like colors, icons, and connectors to make your mind map more visually appealing and easier to follow. Here's how to enhance your mind map:
- Add icons or illustrations: Icons can represent each branch visually, making the map more engaging. Go to the alternative resources online or other slides template, select an icon (like a book for "Vocabulary" or a speech bubble for "Speaking"), copy it (Ctrl+C or Cmd+C on Mac), and paste it (Ctrl+V or Cmd+V on Mac) onto your mind map.
- Add speech bubbles or callouts: These can be added by clicking Shapes → Callouts. Use these to highlight specific tips or techniques.
- Connect branches with arrows or lines: Use connectors to link the branches back to the central idea. Click Insert → Line or Shapes to add connecting lines. Adjust the style, color, and thickness to suit your map's design.This is almost the last steps of how to make a mind map in Google Slides.
Pro tip:
Use curved lines instead of straight ones for a more natural and visually pleasing look. Your brain tends to find curves more appealing than harsh, straight lines.
Step 6. Finalizing Your Mind Map
Once all the elements are in place, take a step back and review your mind map. Make sure everything is clear, organized, and visually appealing. Adjust any elements that seem out of place, and ensure the colors and fonts are consistent throughout.
Now you create a mind map in Google Slides! Use it as a study guide, a planning tool, or even a reference for your language learning journey.
Is There Mind Map Google Slides Template?
Some people may think make a mind map in Google Slides is not easy and want to use some templates. Google Slides does not have a dedicated mind map template by default, you can find and use templates available online.
Websites like Slidesgo , SlidesCarnival, and Canvaoffer free and customizable mind map templates for Google Slides. Simply download the template and open it in Google Slides to start editing.
Note:
The templates on these websites are beautifully designed and visually appealing, but most of them require payment to download. If you don't need something overly fancy, you can follow the steps outlined earlier to create a mind map from scratch.
Bonus Tips: How to Make a Good Slides in Short Time?
Now you have already known how to create a mind map in Google Slides. Sometimes, you need to create a PPT quickly, and that's where Tenorshare AI Slides comes in handy!
This AI-powered presentation tool helps you generate outlines and content instantly based on your input, offering a variety of customizable templates to make your presentation both structured and visually appealing.
Key Features of Tenorshare AI Slides:
- Generate comprehensive slides outlines and content with one click.
- Ensures accuracy and relevance of your slides content by analyzing vast data sets.
- Choose from a variety of beautiful and engaging templates.
- Simple and intuitive, suitable for all users—students, professionals, and more.
- Free trial available to experience the full range of features.
Conclusion
Mind maps are a versatile tool for organizing information and stimulating creativity. By following the steps of how to make a mind map in Google Slides, you can create effective and visually appealing mind maps using Google Slides.
Moreover, if you're looking to create a professional and well-structured presentation quickly, consider using Tenorshare free AI presentation maker. With just one click, it helps generate compelling slides, saving you time and effort while ensuring a high-quality outcome.
Tenorshare AI Slides
- Free AI Presentation Maker for One-Click Professional Slides in Minutes
- Free Export for All Your Presentation Needs
- Advanced Text and Language Options
- Tailor Your Presentations to Perfection with Our Templates
You Might Also Like
- How to Import, Change Themes to Google Slides: Step-by-Step
- Full Slidesgpt Reviews 2026: Features, Price, Pros and Cons
- PowerPoint Borders: Elevate Your Presentations with Professional and Creative Designs
- In-Depth Slidesai Reviews 2026: Analyze Features, Pricing, and Real User Feedback
- How to Insert a Map in PowerPoint - Step-by-Step Tutorial
- How to Add, Edit and Print Google Slides with Speaker Notes
- How to Add Superscript and Subscript in PowerPoint for Accurate Formatting

Tenorshare AI Slides – Create Slides in Seconds
Professional, customizable and free template available.Tenorshare AI Slides, Make PPT Instantly
Generate slides in one click.
Tenorshare AI Slides – Create Slides in Seconds