The Ultimate Guide to Inserting, Customizing, and Designing Tables in PowerPoint
Creating and customizing tables in PowerPoint is a must-have skill for anyone who wants to present data clearly and effectively. Whether you're adding a straightforward PowerPoint table, setting up a table of contents in PowerPoint, or experimenting with different PowerPoint table design ideas, getting the hang of these features will take your presentations to the next level. This guide will show you how to insert tables, tweak their look, and even pull in data from other sources. You'll also learn how to change table border colors and apply creative design touches to make your slides more engaging and polished.
Catalogs:
How to Insert a Table in PowerPoint
Step-by-Step Guide to Creating a PowerPoint Table
Adding a table in PowerPoint is a straightforward process that allows you to organize data and present it in a clear, structured manner. Here's how you can create a PowerPoint table:
Open your PowerPoint presentation and select the slide where you want to add the table.
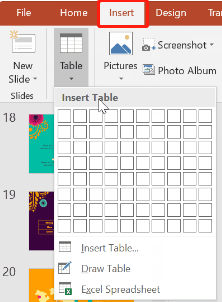
Go to the "Insert" tab on the Ribbon and click on the "Table" button and choose the number of rows and columns you need.
Adjust the size and position of the table as necessary. You can then enter your data directly into the cells.

How to Insert a Table in PowerPoint from Excel
Sometimes, it's easier to work with data in Excel and then bring that data into PowerPoint. Here's how to do it:
In Excel, select the range of cells that you want to copy to PowerPoint.
Right-click and select "Copy" or use the shortcut Ctrl + C.
Go to your PowerPoint slide, click on the area where you want to insert the table, and right-click to select "Paste."
You can choose to paste the table as a linked object, which updates automatically when the Excel data changes, or as a static table that can be formatted in PowerPoint.
How to Add a Table in PowerPoint Using Shortcuts
For those who frequently work with tables in PowerPoint, using shortcuts can save a significant amount of time. Here's a quick guide on how to add a table in PowerPoint:
To insert a table quickly, press "Alt" + "N" + "T" on your keyboard.
Use the arrow keys to select the number of rows and columns you need.
Press "Enter" to insert the table.
Tenorshare AI Slides
- Free AI Presentation Maker for One-Click Professional Slides in Minutes
- Free Export for All Your Presentation Needs
- Advanced Text and Language Options
- Tailor Your Presentations to Perfection with Our Templates
PowerPoint Table of Contents: Creating and Designing
How to Create a Table of Contents in PowerPoint
A table of contents in PowerPoint is essential for long presentations, as it helps the audience navigate through the content easily. To create one in PowerPoint:
Start by creating a new slide at the beginning of your presentation.
Use the "Text Box" tool to list the sections and slide titles.
Hyperlink each section to the corresponding slide by selecting the text, right-clicking, and choosing "Link."
Customizing Your PowerPoint Tables
How to Change Table Border Color in PowerPoint
Customizing the appearance of your tables can make your presentation more visually appealing. Here's how to change the table border color in PowerPoint:
Click on the table you want to modify.
Go to the "Table Design" tab on the Ribbon.
In the "Borders" group, select "Pen Color" and choose your desired border color.
Use the "Borders" dropdown menu to apply the color to specific borders or the entire table.
PowerPoint Table Design Ideas
To make your tables stand out, consider these PowerPoint table design ideas:
Color Schemes: Use contrasting colors for the table background and text to enhance readability.
Shading: Apply shading to alternate rows or columns for better organization of data.
Custom Fonts: Experiment with different fonts to match your presentation's theme and make the text more engaging.
Borders and Gridlines: Adjust the thickness and style of borders and gridlines to create a more polished look.
Use of Icons or Images: Incorporate icons or small images into your tables to visually represent data or categories.
Advanced Table Customization in PowerPoint
How to Change Border Color of Table in PowerPoint
For a more refined customization, here’s how to change the border color of a table in PowerPoint:
Click on the specific cell or table that you wish to modify.
Navigate to the "Table Design" tab on the Ribbon.
Under "Pen Color," select your preferred color.
Apply the color by using the "Borders" dropdown to select which parts of the table should be affected, such as top border, bottom border, or all borders.
Using External Data in PowerPoint Tables
In addition to basic table creation, you can also integrate external data sources, such as Excel or Google Sheets, into your PowerPoint tables:
Import data directly from Excel by copying and pasting as a linked object.
Update the linked object when the source data changes, ensuring that your presentation reflects the most current information.
Format the imported table within PowerPoint to maintain consistency with your presentation's style.
FAQs
How to Create a Table in PowerPoint?
Creating a table in PowerPoint involves selecting the "Table" option from the "Insert" tab and defining the number of rows and columns you need. Once inserted, you can easily enter and format your data.
How Many Rows and Columns are in a Table in PowerPoint?
PowerPoint tables can have up to 75 columns and 75 rows, although the practical limit depends on the content and slide size.
How Do You Make a Table Continue to the Next Slide in PowerPoint?
If your table is too large to fit on one slide, you can split it across multiple slides by copying the rows that overflow and pasting them onto a new slide. Make sure to maintain consistent formatting for a seamless flow. Additionally, consider adding a header row on each new slide for clarity.
Conclusion
This article provides a comprehensive guide on how to work with tables in PowerPoint, from basic insertion techniques to advanced customization options. By following these tips, you can create professional, well-organized presentations that effectively communicate your message. Whether you are creating a PowerPoint table, designing a table of contents in PowerPoint, or exploring different PowerPoint table design ideas, these strategies will help you make the most out of your presentations.
You Might Also Like
- How to Add and Edit Videos in PowerPoint: Step-by-Step Tutorial
- How to Easily Translate PowerPoint Slides: A Quick Guide
- How to Translate Google Slides into Different Languages
- How to Convert Google Slides to PDF: A Step-by-Step Guide
- How to Create and Present a Thesis Defense Presentation
- Comprehensive Guide: How to Insert, Edit, and Remove Text Boxes in PowerPoint

Tenorshare AI Slides – Create Slides in Seconds
Professional, customizable and free template available.Tenorshare AI Slides, Make PPT Instantly
Generate slides in one click.
Tenorshare AI Slides – Create Slides in Seconds